Objectives
- Design and develop a portal for all exercises, studios, process and assignments for this class
- Use this as an opportunity to review and sharpen your lean and mean
html skills and practice semantic markup. Have fun using external
stylesheets to define all visual formatting using current standards
- Explore ideas on effective and appealing user interface design using design principles
- Note: Title all files exactly as described below
Deadlines
- Thursday (01/12): portal, interactive banner and blog sketches,
portal and blog coded, github account registered
- Tuesday (01/12): completed studio exercise, uploaded to github
File structure
- Create a main web folder on your Desktop called des157-w17
- Eventually your folder/file structure will look like this:

Process
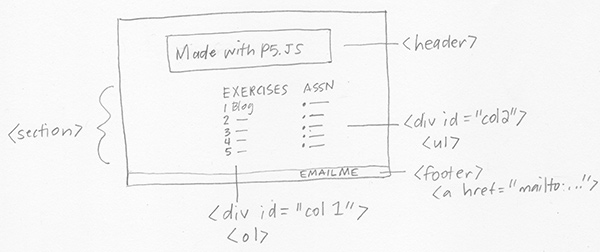
- Sketch the layouts for the portal interface and blog on paper
first and label each sketch with semantic html elements
Portal: index.html and style.css (inside the root directory/folder)
- Create index.html and style.css by hand using a text editor, such as Atom, Brackets or Sublime
- Add an appropriate title with <title>… always title all html documents in the <head>
- Add a <header> that includes page identification...your name, logo, etc, in the <body>
- Add a <div> in the <header> with an id "mySketch" that is 800 x 250 for an interactive banner
...
to be created using p5.js in class on Thursday
- Create a <section> for content with three columns by using flexbox positioning
-
Note: Always use a reset at the start of your css documents for this class
- For the left column, use an h2 to title the column "book ex" and create a <nav> that
includes an unordered list (using <ul> and <li> for each list item) for book exercises
starting with the following:
- For the center column, use an h2 to title the column "studios" and create a <nav> that includes a numbered list (using <ol> to create the list and <li> for each list item) starting with the following studio exercise:
- Blah blah blah (blog)
- For the right column, use an h2 to title the column "project" and create a <nav>
that includes an unordered list (using <ul> and <li> for each list item)
The list items include project process materials. For now you will add the first link:
- Make all list items (of all three columns above) empty links by
adding the following code to each link: <a href="#"> after the <li>
You will activate each link as you complete the exercises through the quarter
- Add a <footer> that clears the floated elements. The footer includes a clickable email link, an html validation link and a css validation link. If you don’t want a clickable email, you can use a form, but you must be emailable directly
from your portal footer
Use the following codes for the validation links:
-
<a href="https://validator.w3.org/check?uri=referer">Valid HTML 5</a>
-
<a href="https://jigsaw.w3.org/css-validator/check/referer">Valid CSS</a>
- Example:
valid html | valid css
- Note: The validation links will not work until the page is uploaded so
manually validate during development. You will not receive a grade for
the studio exercise if your page does not validate for both html and css
Blog: index.html and style.css (inside a blog folder)
- Create a blog in its own folder, with its own stylesheet
-
The blog should link back to the portal, but not share the interactive banner or navigation to exercises, studios and project files
- Add your first blog entry: Evaluate a user interface that you use often in terms of the visual design, appeal and effectiveness. This is an opportunity to communicate your ideas and pespectives on effective interface design. The entry should
be approximately 150-300 words
- Include an image of the interface (that you take yourself). Size and optimize all images
- Reminder: Use semantic html5 (<header>, <section>, <article>, <aside>, <nav>, etc)
-
Update the blah blah blog link on your portal to link to "blog/index.html"
Interactive banner: script.js (inside the root directory/folder)
-
Create an interactive banner for your portal using p5.js that represents something interesting about you
Option: Create your banner by adapting and updating one of your previous Processing sketches
- Save your
- Size: 800 x 250
- Learn more about p5.js here: p5.js.org
Helpful links
Upload
- Do not upload any files (such as non-optimized images)
that are not directly used on your website
- Instructions for github accounts will be given in class on Thursday
- Make sure your code is well formatted (beautified) before uploading
- Submit the URL for this studio to the Canvas Assignment
GRADING:
- sketches: .5
- semantic markup (validates): 1
- proper css (validates): 1
- interactive banner: 1
- three columns: .5
- sized and optimized images: .5
- footer with clickable email,
html and css validation: .5
- blog: .5
- github setup: .5
- total points: 6

